
Testing out my Hazelnut Cream Cake
Today, I will share with you how I tested my Hazelnut Cream Cake! This cake is a fluffy chocolate cake, with a whipped cream filling. I have made it twice to write this post, but I’ll keep updating it until I can get a full recipe together!
A while back, I took a baking class. One of the projects was to create your own dish. I went with a Bacon Ranch Tart, but my other idea was this cake. In January, I made round 1; I brought it to my small group, and everyone liked it!

Round #1:
Planning:
Like most things, I will write down the idea in my notebook and start with bullet points about what I want the cake to be like, the texture, flavor, and presentation. I don’t usually draw it out, but this time I did, and it was beneficial as a visual. I tried looking for the recipe from my class but couldn’t find it. So I went with one of Sally’s recipes. I wrote my outline, grabbed my ingredients, and started baking!
Action:
I started baking the cake part in the morning. It needed enough time to cool, but now that I’m reflecting on it, I don’t know if I let it cool completely. It was just a little warmer than room temperature, which could have made all the difference. It also might have been a little undercook; it does not do well for rolled cakes.
I made the filling with creme fraiche and hazelnut spread. I didn’t think much about the flavor I wanted or even the texture of that. But I added all the cream and about a third of the spread. It was gross. It tasted like plain ol’ creme fraiche. If you’ve never had it, think of a thicker version of sour cream. I added more hazelnut spread, but the sourness and flavor from the creme took over. I added a few crushed hazelnuts, but not enough to notice. I got the filling to taste okay with the cake. I could have added a bit of sugar to it, too, but I didn’t want a grainy filling, so I skipped it.
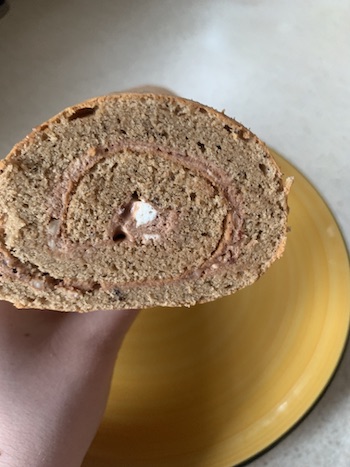
The cake was cooling and looked beautiful, rolled up within the parchment paper. But, when I went to unroll it, that’s where it went downhill. As I unrolled it, the cake was breaking apart with each move I made. I tried to save it, but it was no use. The cake did conveniently break into strips. So, I took the pieces apart and made a stacked cake. A bit uneven, but I think it was fine for a first try.
Tasting:
Overall, it was good, but that was all it was. The flavor was far from what I wanted it to be. The creme fraiche flavor was still too strong, even with the chocolate and hazelnuts. This wasn’t a very sweet cake, which was nice. I don’t like super sweet cakes. This is one reason I’m trying to avoid doing a frosting for this cake. I could have used sugar in the filling, so I’ll add a bit next time. I think a pinch of salt would have helped too. So there’s a lot of room for improvement in the cream area. The actual cake was delicious – soft, fluffy, and not dry!
For my final rating, I am giving this cake a 6.5/10.
Round #2:
Planning:
I didn’t plan too much but reflected on what I did the first time and made some bullet points. I wrote down what I wanted to change and how I would do it. I still had the original goals of what I wanted this cake to be. So I made changes to fit that. I got my ingredients ready, and here is where working at a grocery store comes in handy.
Action:
I started early in the morning. I started by taking the cold ingredients out to get to room temperature. I got organized with bowls and all the other ingredients. The first time I made this, I needed the yolks to be in the biggest bowl, but I accidentally put them in the smallest.
With the filling, I used whipped cream and the hazelnut spread. I added a bit of powdered sugar and a vanilla bean to the mixture. It was delicious! I found the recipe from my baking class, and so I used that. Using a neutral oil ( avocado, coconut, etc.) helps with the cake. Especially since you need to put this one in the fridge, the cake doesn’t harden up like it would if you used butter. The first time, I used half butter and half avocado oil. This time, I used all avocado, and wow! Even overnight, the cake was still spongy. It’ll definitely be cold, but deliciously cold.
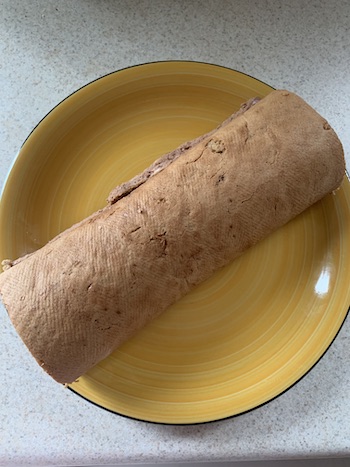
For this time, I used a towel to roll it up, which made another huge difference! I didn’t flour the towel; I was going to but decided against it. It came right off with no problems. It helped the cooling of the cake too! The parchment paper trapped the heat inside itself. With the parchment on the first round, it stuck horribly. The cake was definitely undercooked the first time, too, so all that makes a stacked cake instead of rolled one.
Tasting:
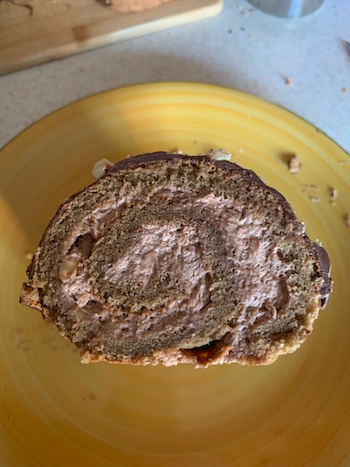
It was amazing. The cake was so light, you could taste the cream, and it tasted like hazelnut! So, so good! The cream did soak into the cake quite a bit, but the flavor was still there. I put a whole vanilla bean in the filling, adding so much more flavor than extract!
Overall, it was a delicious cake! I will make it one or two more times to get a clearer separation between the cream and the cake. In the end, I want a distinct swirl that you can see clearly.
For my final rating, I’m going to give it a 9.5/10!
Round three:
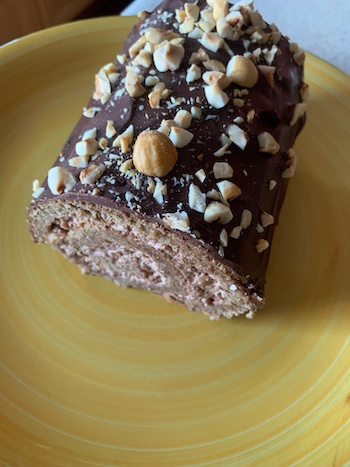
This cake keeps getting better and better every time I bake this. It was amazing, with perfect ratios, textures, and flavors. It rolled up perfectly, and the filling didn’t soak into the cake much, if at all!
Action:
I looked at my notes and didn’t make too many adjustments from Round Two. The most significant difference was in the filling. I used gelatine sheets* to stabilize the whipped cream filling. I used it for Round Two too, but it was so much more stable this time than then.
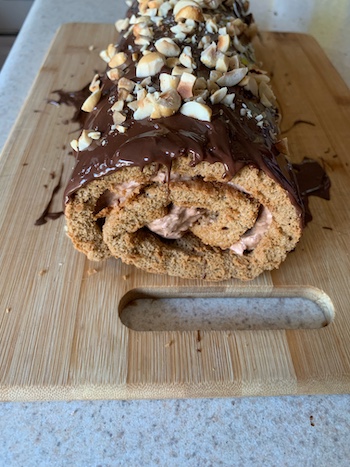
I baked the cake, only slightly overbaked. Still good but less airy. The cake cooled for 2-3 hours, then topped the filling on it. Rolled it up with ease, and into the fridge, it went!
The filling was the same ingredients: heavy cream, hazelnut spread, salt, a bit of powdered sugar, crushed hazelnuts, and gelatine. Gelatine isn’t a very common ingredient, but it is so cool! Most people will use a powder, but I’ve only used sheets. There’s no chance it’ll be grainy, and they’re more fun. I usually have to do more conversions, but that’s fine.
In a small bowl, I let the gelatine bloom in iced water for 5-10 minutes. Once they’re flexible, squeeze the extra water out. Set the bowl on top of a pan to make a double boiler. Let the gelatine melt. Let it cool for a few minutes before adding it to the whipped cream. I made the whipped cream into stiff peaks, folded in the hazelnut spread, and added the melted gelatine once it’s cooled. Combine it and let it sit in the fridge for a few minutes while you prepare your cake.
Slowly unroll the cake and spread the whipped cream mixture over it. I haven’t found the best way to do this yet. I always overfill, and it leaks out. But definitely focus on filling well at the first fold. Roll it back up and wrap the towel around it again to help it form. Place back into the fridge for a couple of hours or until set.
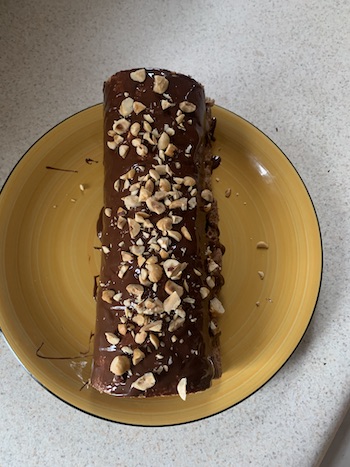
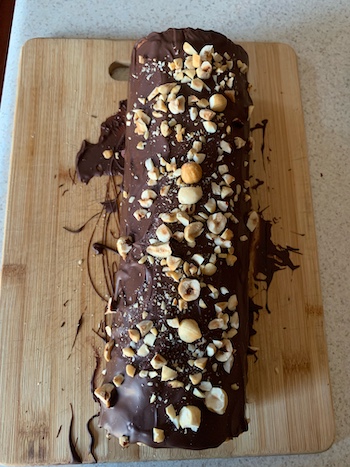
Next, the topping! It’s a simple topping with melted chocolate chips and some hazelnut spread. I used the double boiler to melt the chips and spread. The first two times, I used just chocolate chips. Both times were good, and I didn’t see much difference in flavor.
Tasting:
It gets better every time. So delicious! The cake was just so slightly overcooked but still soft and spongy. The vanilla bean in Round Two made a difference in the filling. There was so much more vanilla flavor! I just used extract in rounds One and Three. The biggest accomplishment this round is the cream not soaking into the cake! The cream in Round Two disappeared after a few hours, but this one did not!
This round has been the best ratio. Thicker cream, good cake, and a lovely chocolate topping.
The final rating will be 9.5/10. It would be 10/10 if the cake weren’t overcooked. Comparing the first and third rounds, huge improvement. My rating for the 1st round was way too high, maybe more of a 4.5/10.
I am thrilled to see the improvement and how it turned out!
Tips for you:
- Use a kitchen towel instead of parchment paper. It’s easier to mold, cool and less likely to stick.
- I used 3.5 silver sheets for 1 cup of heavy cream*
- Whipping the egg whites should be the last thing you do. Preheat your oven, prepare your pan, and mix up the batter. You want the least amount of time between whipping and the oven. The more the time they’re out, they’ll deflate, and it will affect the cake.


So glad it rolled well in the towel! Laura ran into that several times that she made a pumpkin roll for Thanksgiving and found that the towel worked best for her, too! Looks delicious!!
I love reading about the process while cooking! It helps to hear the events of making a recipe!